Prince William County Drywall Contractor | DMV Drywall Repair Service

Kitchen Cabinet

Kitchen Cabinet

Get a Quote

This is an excerpt from the Book called “Home Improvement. Continue reading to learn more about Kitchen Cabinet, thanks to the author.

Key Points To Consider 

Cabinets are a major design feature (and expense) in any kitchen remodelling project. Whether you are planning to build your own, buy and install ready-made units, or have the work done by professional, there are many decisions you have to make before investing in cabinets.  

Besides cost, the main factors to consider when planning and selecting cabinets are quality, appearance, efficiency, and capacity. When shopping for cabinets, research styles, models, and configuration. Visit home-improvement centers and kitchen-design showrooms to exampate different cabinets and to understand how they are made. Make sure the brand you buy provides the features you want at a price you can afford. Look for guarantees that ensure your satisfaction for years to come. 

Planning and Kitchen Layout 

Planning and Kitchen Layout 

The primary function of a cabinet is to provide storage. All cabinets perform this function, but some installations work better than others. Why? Because a well-designed arrangement of kitchen cabinets puts the storage where you need it, keeps stored items within reach, and creates an efficient work space with sensible traffic patterns. How do you plan the best layout for your kitchen conveniences? Here are some guidelines. 

A good kitchen layout includes enough activity space, allows a smooth flow of traffic, organizes the work spaces into an efficient triangle, accommodates appliances well, stores food and cooking utensils exactly where they are needed, and provides adequate lighting. If the total space is not planned well, the cabinets will not work well either. The most beautiful cabinets cabinets in the world cannot overcome an inefficient kitchen. 

The basis of kitchen design is the “work triangle,” a set of imaginary lines that connect the three major appliances—sink, stove, and refrigerator. When configured properly, the traffic pattern between the sink, stove, and refrigerator should form a triangle that allows maximum efficiency of the space. Each leg should be from 4 to 7 feet long; the total length of all three legs should measure from 12 to 21 feet. The best arrangements attempt to place the sink at an equal distance from the other two appliances. Some kitchens, such as long, narrow galley kitchens in older homes, do not easily conform to work triangle ideals. If that’s the case, use the work triangle as a helpful guideline. 

Once you have laid out your work triangle, refine the size, placement and style of your cabinets with the following principles in mind: 

  • Total frontage of base cabinets, not counting sink or corner cabinets, should be no less than 13 feet for small kitchens and 16 feet for medium and large kitchens. 
  • Total frontage of wall cabinets should be at least 12 feet for small kitchens and 16 feet for medium and large kitchens.  
  • Arrange cabinets so that every item is stored in the area where it is used. Put pots and pans near the oven and cooktop. Plates and glassware should be readily accessible to dining areas. Store dishtowels near the sink and dishwasher. 
  • Base cabinets with large drawers and pull-out shelves are more efficient than fixed-shelf cabinets because you can reach their entire depth. Items are often “lost” at the back of fixed shelves. 
  • Lazy-Susan cabinets are more efficient than fixed-shelf corner units. The type with doors attached to a revolving tray tend to pinch fingers. Diagonal or right-angle doors are safer. 
  • Wall cabinets with adjustable shelves reduce wasted space. Put taller items at the bottom of the shelf unit; smaller, lighter items near the top.  
  • Lower your reach—put the top shelf of a wall cabinet no higher than 6 feet.  
  • Sink bases are available with a tilt-down front panel. The recess conceals a small tray for sponges and scrubbers, 
  • Hang wall cabinets above a sink or stove no lower than 5 feet from the floor, including a range hood. 
  • Make the cabinet over a refrigerator deep—24 inches instead of 12. 
  • The increased depth provides storage space for large, seldom-used items. 
  • If the minimum frontage for bate and wall cabinets cannot be met, or window space is of higher priority than wall cabinets, place a tall storage unit along a short wall. These units are 7 feet tall, 12 to 24 inches deep, and 18 to 36 inches wide. Some include small shelves in the doors or pull-out shelves sand bins. 
  • Although wall cabinets can be designed to extend to the ceiling, will you really use the upper shelves? An option is to use the tops of standard-height cabinets for displaying seldom-used items. 

Sizes 

Except for unique situations requiring a custom design, cabinet dimensions are standard throughout the industry. Base cabinets are always 24 inches deep (the countertop is added, it brings the total height to a comfortable 36 inches. 

Wall cabinets are 12 inches deep and from 12 to 48 inches wide. Most are 30 inches high; when installed 18 inches above the countertop, the tops are 84 inches above the floor. 

Wall cabinets also are available in 12-, 15-, 18-, and 24-inch heights for installations over sinks, ranges, refrigerators, and windows. Allow at least 30 inches of clearance above a cooktop, even when a range hood is under the cabinet. A bar counter is generally 42 inches high. Built-in de4sks or tables are usually 29 to 30 inches high—standard base cabinets won’t work to support a built-in desk surface. 

Efficiency And Capacity 

The primary function of a kitchen cabinet is to provide concealed storage and keep stored items free of dust. All cabinets perform this function, but some installations work better than others. Why? Because the storage is located where needed, and because it is easy to use. 

Efficiency And Capacity 

The core of cabinet planning is a good kitchen layout—one that includes enough activity space, that allows a smooth flow of traffic, that organizes the work spaces into an efficient triangle, that accommodates appliances well, and that provides adequate lighting. If the total space is not planned well, the cabinets will not work well either. The most beautiful cabinets cabinets in the world can not overcome an inefficient kitchen. 

The size, placement, and style of the cabinets should be refined keeping all the following principles in mind: 

  • Total frontage of base cabinets, not counting sink cabinets or corner cabinets, should be no less than 13 feet for small kitchens and 16 feet for medium and large kitchens. 
  • Total frontage of wall cabinets should be at least 12 feet for small kitchens and 16 feet for medium and large kitchens. 
  • Cabinets should be arranged so that every item can be stored in the area where it is used. 
  • Base cabinets with large drawers and pull-out shelves are more efficient that fixed-shelf cabinets. 
  • Lazy-Susan corner cabinets are more efficient that those with fixed shelved. The type with doors attached to a revolving tray tend to pinch fingers. It is better for corner cabinets to have diagonal doors or right-angle doors. 
  • Wall cabinets with adjustable shelves reduce wasted space. 
  • The top shelf inside a wall cabinet should be no higher than 6 feet for maximum accessibility. 
  • Sink bases are available with a tilt-down front panel. The recess behind conceals a small tray for storing sponges and scrubbers. 
  • Wall cabinets above a sink or some should be no lower than 5 feet from the floor, including a range hood. 
  • The cabinet over a refrigerator should be 24 inches instead of 12 inches deep provided in is not connected to other 12-inch wall cabinets. The increased depth provides storage space for large items that are seldom used. 
  • If the minimum frontage for base and wall cabinets cannot be met, or if window space is of higher priority than wall cabinets, place a tall storage unit along a short wall. These units are 7 feet tall, 12 to 24 inches deep, and 18 to 36 inches wide. Some include small shelves in the doors or pull-out shelves and bins. 
  • While wall cabinets can be designed to extend to the ceiling, will you really use the upper shelves? An option is to use the tops of standard-height cabinets and display decorative items on the tops of the cabinets.   

Sources 

Cabinets are categorized as stock, modular, and custom.  

Stock cabinets are mass-produced and commonly kept in stock by dealers. The are usually of low to medium quality. Modular cabinets are displayed in kitchen showrooms. After you select and order the cabinets that fit your layout, they are assembled from modular components at a factory and shipped to you. 

 Custom cabinets are made to your specifications by cabinetmakers who build the units to fit your space and particular needs. Custom cabinets may be prove less expensive than buying from a kitchen showroom, even though the service and quality are comparable. 

Terminology 
Terminology

If you select custom cabinets, ask the cabinetmaker for references and apply the same standards of quality that you would to any expensive purchase. 

Terminology 

There’s more to cabinetry than “cabinets,” and the terms applied to today’s units can be confusing. Here’s a set of definitions: 

Appliance Garage: A small storage cabinet, typically installed directly on the countertop, it is used to hide small, frequently used appliances such as toasters or blenders. The tambour door of an appliance garage slides up much like a folding garage door. 

Base or Base Frame: The pedestal on which the base cabinet rests—typically 4 to 4 5/8 inches (higher for European cabinets). 

Base Cabinet: A lower cabinet on which the countertop rests, typically 34 ½ inches tall and 24 inches deep. 

Box: The main body of the cabinet, also referred to as a case or carcass. The box is made from plywood or particleboard, with a back for attaching to the wall and braces or “stretchers” across the top to which the countertop is attached. 

Corner Cabinet: Either an upper or a base cabinet especially designed to form a 90-degree corner in a run of cabinets. 

Deck: The permanent bottom shelf of a cabinet. 

Double-sided Cabinet: An upper cabinet suspended over a peninsula and accessible from either side. 

Face Frame: The front framework of a cabinet, consisting of horizontal rails and vertical stiles or mullions. It is usually made from the same material as the doors and drawer fronts. Not all cabinet styles have face frames. 

End Panels: Decorative pieces of plywood or similar material that cover exposed cabinet sides. 

Fillers: Narrow sections of face-frame material intended to fill the empty spaces when a row of cabinets does not quite fit wall to a wall. Fillers can be cut to the exact width of the space. 

Island Cabinet: A freestanding base cabinet usually positioned in the center of a larger kitchen. For convenience, an island cabinet may have a second sink. 

Lazy Susan: A turntable with rows of circular shelves—typically mounted inside a corner cabinet. A lazy Susan rotates and provides access to stored items. 

Peninsula Cabinet: Usually refers to a base cabinet that juts out into a kitchen space and is accessible from both sides. One end of a peninsula cabinet remains joined to the run of base cabinets.  

Sink Front: A cabinet without a deck or a back to accommodate plumbing pipes and electrical hook-ups for appliances such as disposers. 

Specialty Cabinets: These include corner cabinets (either “blind” or “lazy Susan” units), island and peninsula cabinets, and built-in oven cabinets.  

Toe Kick: A recessed space under base cabinets that allows you to stand close to the cabinet. It is usually 3 inches deep. It is automatically created when a base cabinet is positioned on a base frame of lesser depth. 

Unfitted Cabinet: A freestanding cabinet made to look like a piece of furniture and designed to provide additional storage. 

Utility Cabinet: A tall storage unit with shelves, or an open cabinet that functions as a broom closet. 

Wall Cabinet: An upper, wall-hung cabinet, typically 30 inches tall and 12 Inches Deep. 

Preparing For The Installation 

Whether you are constructing your own or purchasing ready-made kitchen cabinets, installing them is a meticulous and demanding task. All the units must be level, plumb, and square; all joints tight and flush; and all doors and drawers aligned. Before you begin, carefully study the following techniques and read the manufacturer’s instructions. Note especially the differences between framed and frameless cabinets. There is no margin for error with frameless cabinets; if not perfectly square and straight, their doors and drawers will not open or close properly. 

Make sure all the walls and ceilings are smooth, and finish the soffits. Install any rough wiring required for under-cabinet lighting. Complete the painting and hang the wall covering. If the finished floor is down, protect it with plywood or cardboard while the cabinets are being installed. 

Preparing For The Installation 

When you cabinets arrive, inspect them for defects and measure them to verify they are the size you ordered. Make sure the doors fit, none of the boxes is warped, and all the drawers slide perfectly. Remove all doors and mark on each the cabinet it belongs to. 

Laying Out Kitchen Cabinets 

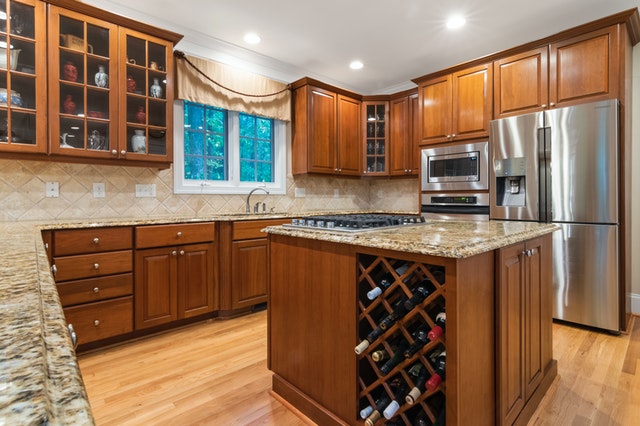
To start your cabinet layout, use a 4-foot level to locate the highest point of the floor the base cabinets will cover. If the highest point is not against the wall, use a level and a pencil to transfer the height of that point to the wall. Measure up 34 ½ inches from this mark and make a second mark indicating the top of a base cabinet. Allow for the thickness of the finished floor if it is not yet installed. Then mark the wall at 36 inches for the countertop. 

Draw Lines. Using the straightedge and a level, draw lines on the wall to represent the tops of the base cabinets and countertop. The line will eventually be covered over by the counter or backsplash, so make it heavy enough that you can see it.  

Draw another line at the level of the tops of the wall cabinets. Most wall cabinets start 18 inches above the countertop and are 30 inches tall. Therefore, for most installations, this line will be 84 inches above the highest point of the floor (36+18+30=84). 

If the wall cabinets will extend to a soffit or the ceiling, you’ll need to find the lowest point of the ceiling or soffit. Draw a level line on the wall at that height for the cabinet tops. You can now see how your wall unit will fit. You may have to trim its top (or base, depending on the manufacturer’s recommendations) or cover a gap with molding once the cabinet is installed. 

With the lines on the wall as a guide and using a level, mark the cabinet locations on the wall. Make sure they line up properly with each other and with windows, sinks, and appliances. 

Mark Stud Locations. Next, find the studs—probe the wall with a nail until you locate both edges of the stud. 

The wall below the line will be hidden by the cabinets, so don’t worry about making nail holes. Mark the exact center of the stud on the wall. Using a level, draw a vertical line through this mark so you can see it above the top of the base cabinets. Most of the other studs should be either 16 or 24 inches on-center from the first and. Mark the center of each stud behind the upper cabinets. If there is blocking between the studs, mark a horizontal line at the center of the blocking where the cabinets will be hung. 

Typically, wall cabinets are installed before base cabinets. However, if you have a solid backsplash that will extend all the way up the wall to meet the wall cabinets, you’ll need to install the base cabinets and the countertop first. It is also better to install the base cabinets first if there is a full-height cabinet in the middle of a run. 

Start a run of wall cabinets with a full-height unit or a corner unit if you have one. Otherwise, start at whichever end will not require filler. The first cabinet must be perfectly level, plumb, and square or the entire run will be out of alignment. 

Measure the stud placement behind the first cabinet and transfer these measurements to the inside of the cabinet at the top and bottom hanger rails (wood strips). At these marks, countersink and drill screw holes through the back of the cabinet. 

If the cabinets are frameless, they may come with a metal support rail. Cut the rail to length and screw it securely to each stud at the height recommended by the manufacturer. 

Hang the Cabinets: With a helper, lift the first cabinet into place and slide a prop under it. Attach the cabinet to the studs with 3-inch drywall screws, tightening only one of the top screws and leaving the others slightly loose. If the wall bows inward, shim the cabinet out next to a screw. Use a level to check that the cabinet is plumb in all directions and tighten the rest of the screws.  

Now transfer the stud dimensions to the inside of the second cabinet and countersink and drill its screw holes. Drill two more holes through the stile on the side that will attach to the first cabinet. (Drill these holes where the door hinges will later cover the screw heads.)  

Lift the second cabinet into place, support it, and clamp the two cabinets together so that the joint between them is tight and flush. (Use wood scraps to protect the cabinet finish from the clamps.)  

Choose a drill bit slightly smaller than the shank of a 1 ½ -inch drywall screw and center it in one of the holes you drilled in the stile. Drill two-thirds of the way into the adjoining stile of the first cabinet. 

Kitchen Cabinet

Do the same for the other hole and drive the screws firmly into the stile. If the cabinets are tall, or if the face frames do not align perfectly, drill more holes and add more screws. Then attach the cabinet to the back wall in the same way as you did the first cabinet. 

Finishing Up: Repeat this process for the rest of the wall cabinets in the same run. If a vent hood will be mounted under a wall cabinet, cut holes in the cabinet for the exhaust duct before you install the cabinet. 

In frameless cabinets, the stile holes are already partially drilled at the factory. All you have to do is complete the drilling. Special fasteners screw into each other through the holes, leaving a smooth head on each side that is covered with a plastic cap. 

If the last cabinet ends at a sidewall, you may need to add a filler piece to close a gap. Fillers come in 3-inch and 6-inch widths and must be cut to fit snugly. Before you install the last cabinet, attach the filler to the stile as you would attach two cabinets together. Then take a series of measurements between the wall and the last cabinet installed. Transfer these measurements to the face of the final cabinet, marking them on the filler piece. Now connect the marks with a line. Cut along the line with a fine-toothed saber saw, angling the back of the cut toward the cabinet. The cut will follow any deviations in the wall so that the filler piece will fit perfectly. Filler pieces for corners need only be ripped to width, not scribed and cut.